
Đồng hồ thời gian thực và dự báo thời tiết với NodeMCU qua Internet| Dự án IoT
Dự án này cho thấy cách tạo đồng hồ thời gian thật và thông tin thời tiết được hiển thị trên màn hình OLED SSD1306.
OLED SSD1306 được sử dụng trong dự án được cấu hình để hoạt động ở chế độ I2C, một số board OLED SSD1306 có thể yêu cầu sửa đổi nhỏ phần cứng (để chọn giữa chế độ SPI hoặc chế độ I2C) như hàn, nối dây.
Yêu cầu phần cứng: (các linh kiện có sẵn trên cachdung.com)
- Board phát triển ESP8266 NodeMCU
- Màn hình OLED SSD1306 với độ phân giải 128 × 64 Pixel
- Cáp micro USB (để lập trình và cấp nguồn cho mạch)
- Breadboard
- Dây nối
Sơ đồ đồng hồ thời gian thực và thời tiết với NodeMCU:
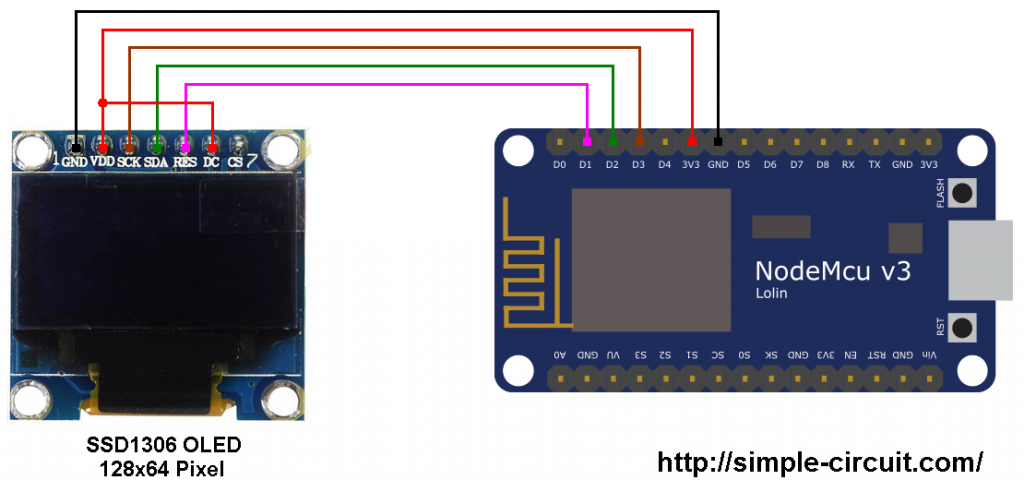
Sơ đồ sơ đồ mạch dự án được hiển thị bên dưới.
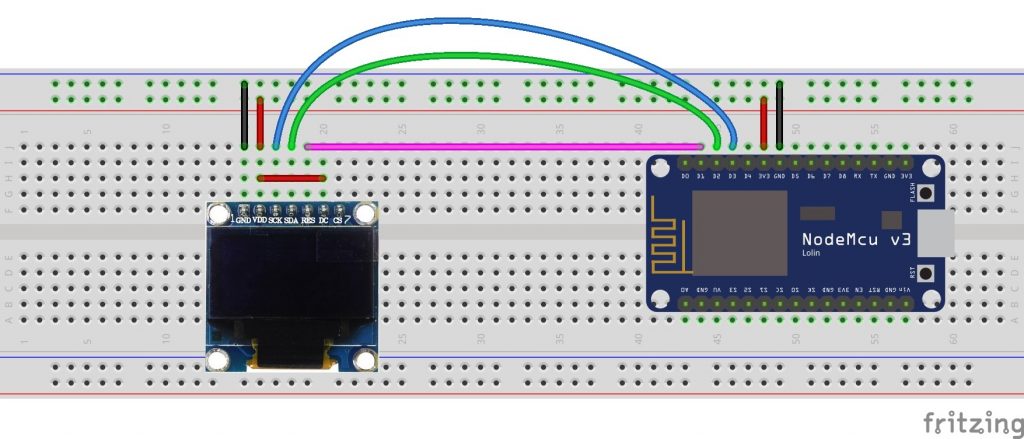
Và hình ảnh sau đây hiển thị cách nối dây trên breadboard:
Các chân SDA và SCL của bus I2C nối với GPIO4 (D2) và GPIO0 (D3) của board NodeMCU (tương ứng), chúng được nối với các chân SDA và SCL (SCK) của mô-đun hiển thị SSD1306.
Chân Reset (RES) của mô-đun hiển thị được kết nối với GPIO5 (D1) của board phát triển NodeMCU.
Mô-đun hiển thị SSD1306 được cung cấp nguồn 3,3V từ board NodeMCU.
Code cho dự án:
Dự án sử dụng một số thư viện cần được cài đặt, liên kết tải xuống bên dưới:
Thư viện đầu tiên là NTPClient (NTPClient.h), thư viện này kết nối WiFi ESP8266 với máy chủ thời gian, máy chủ này gửi thông tin thời gian đến mô-đun. NTP: Giao thức thời gian thực.
Thư viện NTPClient – liên kết trực tiếp
Thư viện thứ 2 là thư viện thời gian Arduino (TimeLib.h), thư viện này chuyển đổi thời gian Unix (Unix epoch) thành: giây, phút, giờ, ngày trong tuần, ngày, tháng và năm. Giới hạn Unix là từ ngày 1 tháng 1 năm 1970 UTC / GMT).
Về cơ bản, máy chủ thời gian gửi thời gian ở định dạng epoch Unix cần được chuyển đổi, thư viện này thực hiện tất cả công việc. Liên kết tải xuống dưới đây:
Thư viện thời gian Arduino – liên kết trực tiếp
Thư viện thứ 3 là thư viện ArduinoJson (ArduinoJson.h), chúng ta có thể cài đặt nó bằng cách truy cập:
Arduino IDE –> Sketch –> Include Library –> Manage Libraries
Một cửa sổ mới sẽ mở ra, trong hộp tìm kiếm ghi: arduinojson
chọn phiên bản thư viện (Tôi đang sử dụng phiên bản 5.13.2) và nhấp vào cài đặt.
Chúng ta có thể cài đặt thư viện theo cách thủ công bằng cách tải xuống từ URL sau: Thư viện ArduinoJSON
Sau khi tải xuống, giải nén tệp nén và một thư mục có tên ArduinoJSON-5.13.2 sẽ xuất hiện. Di chuyển thư mục vào thư mục thư viện Arduino, thư mục nên được đổi tên thành ArduinoJSON (loại bỏ -5.13.2).
Để cài đặt thư viện đồ họa Adafruit (Adafruit_GFX.h) và trình điều khiển OLED Adafruit SSD1306 (Adafruit_SSD1306.h), hãy xem bài sau:
ESP8266 NodeMCU giao tiếp với SSD1306 OLED
Các thư viện khác được tích hợp sẵn bao gồm: ESP8266WiFi.h, WiFiUdp.h, ESP8266HTTPClient.h và Wire.h.
Thời tiết của London, Vương quốc Anh được cập nhật cứ sau 1 phút, tôi sử dụng code như sau:
if (last_minute != minute_) // update weather every 1 minute{...last_minute = minute_;}
Code hoàn chỉnh:
// ESP8266 WiFi main library#include <ESP8266WiFi.h>// Libraries for internet time#include <WiFiUdp.h>#include <NTPClient.h> // include NTPClient library#include <TimeLib.h> // include Arduino time library// Libraries for internet weather#include <ESP8266HTTPClient.h> // http web access library#include <ArduinoJson.h> // JSON decoding library// Libraries for SSD1306 OLED display#include <Wire.h> // include wire library (for I2C devices such as the SSD1306 display)#include <Adafruit_GFX.h> // include Adafruit graphics library#include <Adafruit_SSD1306.h> // include Adafruit SSD1306 OLED display driver#define OLED_RESET 5 // define SSD1306 OLED reset at ESP8266 GPIO5 (NodeMCU D1)Adafruit_SSD1306 display(OLED_RESET);// set Wi-Fi SSID and passwordconst char *ssid = “DJAWEB”;const char *password = “ABCdef0123456789uvwXYZ@*123*@”;WiFiUDP ntpUDP;// ‘time.nist.gov’ is used (default server) with +1 hour offset (3600 seconds) 60 seconds (60000 milliseconds) update intervalNTPClient timeClient(ntpUDP, “time.nist.gov”, 3600, 60000);// set location and API keyString Location = “London,uk”;String API_Key = “1041444a18cfb8448343254a45721b1d”;void setup(void){Serial.begin(9600);delay(1000);Wire.begin(4, 0); // set I2C pins [SDA = GPIO4 (D2), SCL = GPIO0 (D3)], default clock is 100kHz// by default, we’ll generate the high voltage from the 3.3v line internally! (neat!)display.begin(SSD1306_SWITCHCAPVCC, 0x3D); // initialize with the I2C addr 0x3D (for the 128×64)// init doneWire.setClock(400000L); // set I2C clock to 400kHzdisplay.clearDisplay(); // clear the display bufferdisplay.setTextColor(WHITE, BLACK);display.setTextSize(1);display.display();WiFi.begin(ssid, password);Serial.print(“Connecting.”);display.setCursor(0, 24);display.println(“Connecting…”);display.display();while ( WiFi.status() != WL_CONNECTED ){delay(500);Serial.print(“.”);}Serial.println(“connected”);display.print(“connected”);display.display();timeClient.begin();delay(1000);}char Time[] = ” : : “;char Date[] = ” – -20 “;byte last_second, last_minute, second_, minute_, hour_, wday, day_, month_, year_;void loop(){if (WiFi.status() == WL_CONNECTED) // check WiFi connection status{timeClient.update();unsigned long unix_epoch = timeClient.getEpochTime(); // get UNIX Epoch timesecond_ = second(unix_epoch); // get seconds from the UNIX Epoch timeif (last_second != second_) // update time & date every 1 second{minute_ = minute(unix_epoch); // get minutes (0 – 59)hour_ = hour(unix_epoch); // get hours (0 – 23)wday = weekday(unix_epoch); // get minutes (1 – 7 with Sunday is day 1)day_ = day(unix_epoch); // get month day (1 – 31, depends on month)month_ = month(unix_epoch); // get month (1 – 12 with Jan is month 1)year_ = year(unix_epoch) – 2000; // get year with 4 digits – 2000 results 2 digits year (ex: 2018 –> 18)Time[7] = second_ % 10 + ‘0’;Time[6] = second_ / 10 + ‘0’;Time[4] = minute_ % 10 + ‘0’;Time[3] = minute_ / 10 + ‘0’;Time[1] = hour_ % 10 + ‘0’;Time[0] = hour_ / 10 + ‘0’;Date[9] = year_ % 10 + ‘0’;Date[8] = year_ / 10 + ‘0’;Date[4] = month_ % 10 + ‘0’;Date[3] = month_ / 10 + ‘0’;Date[1] = day_ % 10 + ‘0’;Date[0] = day_ / 10 + ‘0’;display.setCursor(0, 0);display.print(“Time:”);display.setCursor(60, 0);display.print(Time); // display time (format: hh:mm:ss)display.setCursor(0, 11);display_wday();display.print(Date); // display date (format: dd-mm-yyyy)display.display();last_second = second_;}if (last_minute != minute_) // update weather every 1 minute{HTTPClient http; // declare an object of class HTTPClient// specify request destinationhttp.begin(“http://api.openweathermap.org/data/2.5/weather?q=” + Location + “&APPID=” + API_Key); // !!int httpCode = http.GET(); // send the requestif (httpCode > 0) // check the returning code{String payload = http.getString(); // get the request response payloadDynamicJsonBuffer jsonBuffer(512);// Parse JSON objectJsonObject& root = jsonBuffer.parseObject(payload);if (!root.success()){Serial.println(F(“Parsing failed!”));return;}float temp = (float)(root[“main”][“temp”]) – 273.15; // get temperature in °Cint humidity = root[“main”][“humidity”]; // get humidity in %float pressure = (float)(root[“main”][“pressure”]) / 1000; // get pressure in barfloat wind_speed = root[“wind”][“speed”]; // get wind speed in m/sint wind_degree = root[“wind”][“deg”]; // get wind degree in °display.setCursor(0, 24);display.printf(“Temperature: %5.2f C\r\n”, temp);display.printf(“Humidity : %d %%\r\n”, humidity);display.printf(“Pressure : %.3fbar\r\n”, pressure);display.printf(“Wind speed : %.1f m/s\r\n”, wind_speed);display.printf(“Wind degree: %d”, wind_degree);display.drawRect(109, 24, 3, 3, WHITE); // put degree symbol ( ° )display.drawRect(97, 56, 3, 3, WHITE);display.display();}http.end(); // close connectionlast_minute = minute_;}delay(200);}}void display_wday(){switch(wday){case 1: display.print(“SUNDAY “); break;case 2: display.print(“MONDAY “); break;case 3: display.print(“TUESDAY “); break;case 4: display.print(“WEDNESDAY “); break;case 5: display.print(“THURSDAY “); break;case 6: display.print(“FRIDAY “); break;default: display.print(“SATURDAY “);}}// End of code.
Video các bước lắp ráp và demo dự án:
Link bài viết gốc: https://simple-circuit.com/nodemcu-internet-clock-weather-station/